A simple tutorial on how to add section breaks in LibreOffice Writer document with easy step-by-step guide instructions.
LibreOffice, a free and open-source office suite, offers a robust word processing application that’s packed with features to help users create and format their documents. One of the fundamental elements in document formatting is adding section breaks.
Section breaks allow you to divide your document into different sections, each with its own unique formatting. In the earlier article, we saw how to add and remove page breaks in a LibreOffice Writer document.
In this article, we’ll explore how to add section breaks in LibreOffice step by step.
Table of Contents
Page breaks and section breaks
When you add a page break in a document, the content moves to a new page after the page break. However, for sections, it becomes independent from the rest of the documents in LibreOffice. Remember that there are no section “breaks” in Writer. It is called “sections”.
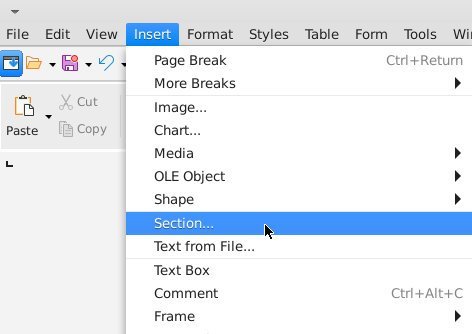
Add section breaks in LibreOffice Writer
- Open the LibreOffice Writer document where you want to place the section breaks.
- Press CTRL+F10 or click menu > View > Formatting marks.
- This will enable the necessary borders to identify the section breaks.
- Put the cursor at a place where you want to add section break.
- From the menu, select Insert > Section. A new section window will open.
- Give a name to your section (default: Section1, Section2…).
- Click on insert. You will see a new section block is added to your LibreOffice Writer document.
- This is separate from all other areas of your document and a basic way to add a section.
- You can also customize section with several properties such as “read-only”, “colours”, etc – refer to below.


Now that you have learned how to add basic section breaks in LibreOffice Writer let’s explore some more customizations.
Edit Section breaks
- After you add a section break, if you want to modify it using the section window, follow the below steps:
- Put the cursor in the section.
- Right-click on the section.
- Select the Edit section from the context menu.
- In the new section window, you should see all the sections listed on the left side.
- Select the one you want to modify.


Read-only section breaks in LibreOffice Writer
- To make a read-only section in a Writer document, right-click and select Edit Section.
- Select the section from the left window which you want to make read-only.
- Select the “Protect” option under “Write Protection”.
- You can also supply a password for editing.

Change the look and feel of section breaks
There are various options to customize the look and fill of the sections in LibreOffice. You can select Edit Section from the context menu.
Click on Options at the bottom of the Edit sections window.
On the Options window you can select column styles, border color & width, paragraph styles, background colour and more.

Other options (DDE)
As of LibreOffice 7.4+, the DDE and link to the ODS file via section are broken. Hence, you can not fetch data from the ODS sheet to a Writer section.
Wrapping up
In this tutorial you learned how to add section breaks in LibreOffice Writer document with additional tips to customize. If you have questions, do let us know in the comment box below.